Mostly done countertop 1/2
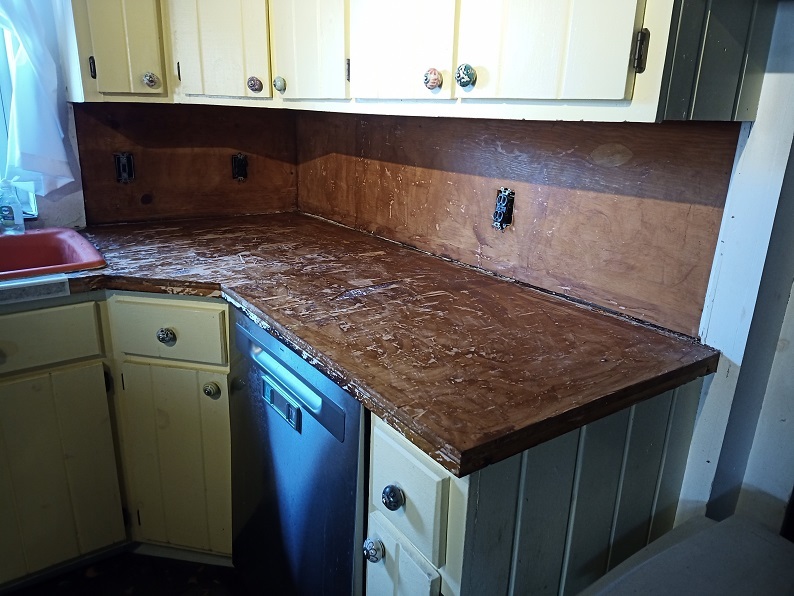
Feb. 12th, 2024 09:04 amOur countertops were gross. They were laminate tiles (floors?) that were glued on and the corners taped. It was so easy for dirt and gross stuff to get stuck in the tape and it was just icky. I picked up some supplies last week and got started on it Thursday afternoon. I started on the smaller but more difficult counter since it holds the sink. Here is the counter before, the sinks is off to the left

There weren't any outlet covers before I started in case you were wondering. I started pulling the tiles off and discovered that under the tile was....the old countertop. They never removed it. It was thin plastic fake wood and it was chipped and also gross. The tile cracked off in big pieces using the hammer claw but the plastic underneath had been glued onto the plywood and I guess ruined the plywood some. I had to use a chisel to get a big portion of it out and I ripped up bits of the plywood as well. Like some of the top layers of the plywood came up.
I also removed the weird wood board backsplash and those were glued on. And then I tried to remove one and the entire backsplash came away and I realized it was also the weird plastic fake wood in one big panel. Turned the electrical off, removed the backsplash in pieces. I had to break it to get it off around the outlets. I also found a note where they had done a shit job on the light switch on the left backsplash under the boards "This fabulous mess is brought to you by 'former owner' and 'friend'". I was steaming mad at that because it was such a terrible job.
Here is the counter and wall stripped down.
F put wood filler on the counter that I destroyed to level out the worst of the bits.
The hard part was around the sink. I debated on what to do. I didn't want to remove the sink because that would be super complicated and I suspected it was heavy. I went and got tacos for dinner one night and talked to my dad about the project. I decided I would lay 1/4 super smooth plywood over top of the counters in place. My dad had suggested getting premade counter tops but none of the counters are standard size except literally the one in the main part of the photo. The sink counter was an inch smaller. The plywood underneath was still solid, it was two pieces of 3/4 inch glued together until I really looked at it, and realized the bottom 3/4 inch board was actually a bunch of 3/4 inch planed tongue and groove planks. They must have gotten them super cheap, they're everywhere in the house. It was held onto the counters by...the sink and the trim.
Eventually I figured out that I could just lift the sink up slightly, get the old countertop out from under it and set it back on the 3/4 plywood. There wasn't any reason the sink needed to be on top of the 1/4 plywood and if I could get a good seal it was fine. So that's what I did. I had to borrow a pipewrench from a friend since I didn't have one for some reason. I will fix that soon. But the pipe seals were stuck, so I undid the drainpipes enough that they would move, gently pried the sink up and put shims underneath all around. I didn't need to unhook the water pipes at all since they had a lot of slack. I only raised the sink 3/8 inch or so. But it was enough to crack out the tile and plastic almost all the way around. I couldn't get it out from behind the sink, which was only 3/8inch wide. But the previous owner hadn't laid the tile down back there, and also hadn't caulked it. Argh!
I worked around, moving shims as I removed old counter. Finally got everything out that I could. Vacuumed everything and set the sink back down. Hooked the pipes back up, ran the water and no leaks! It probably got dropped 1/8 of an inch, so plenty of wiggle room in the pipes for that.
In this process I figured out that the sink is cast iron.
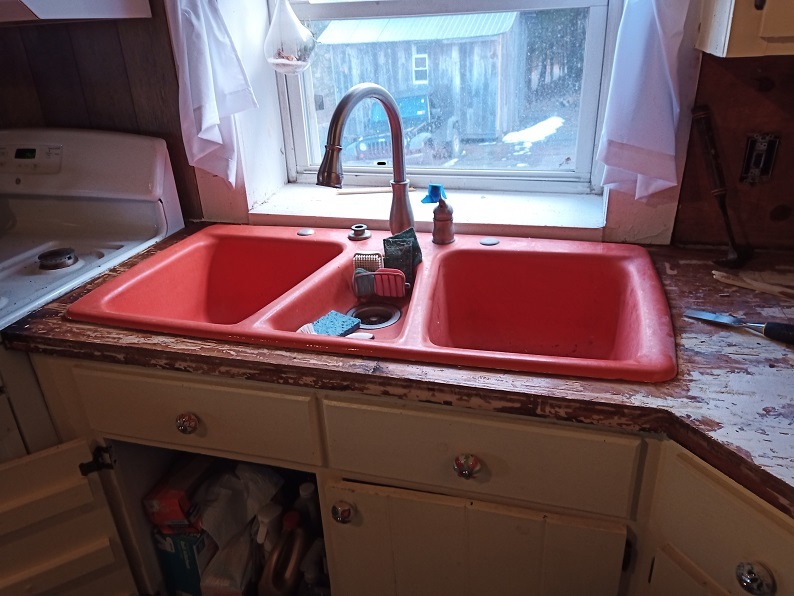
Please note that every side of the sink is round.
Then I started cutting plywood to size. This was the easy part. I had my jigsaw and a bunch of measurements and went to town. Easy peasy and the counter was almost square. Then I had to do around the sink. It took so long to check the wood, take another 1/8 inch off, check, then take another 1/8 off one spot, then another spot. Thankfully I was able to trace the cuts I made on the right side for the left side, but the front and back had to be done separately. The back I ended up breaking the 1/4 inch plywood because it was so delicate. It was fine. I used my extremely cool new tool, the oscillating saw, to cut out trim, cut edges of plywood that stuck out 1/4 inch more than needed and to sand everything smooth. Very fun.

I also installed a GFCI outlet since it is in the counter. That circuit runs the two outlets with the faceplates and the dishwasher. I still need to replace the light switch but it's a different circuit that runs a light and the stove. I screwed down the 1/4 inch plywood because it was easier than trying to glue it and I had just gotten done being very mad at someone for glueing stuff down. It was good I did since I screwed down the right side of the sink and then had to remove it to use it as a template for the left.
Yesterday morning, I made another run to the store because I hadn't actually decided how I was going to attach the vinyl. Picked up double sided tape. Cut my first chunk out and then realized I had cut the shape flipped from how I needed it since I was cutting on the bottom side, not the top. But that's why I had bought extra. Spent the day cutting and taping the counter down and here's where I'm at now.

I'm pleasantly surprised at how it's going. I'm not matching the counters where I make cuts, we don't care. Left to do: the back of the sink, caulk the bejesus out of it all, seal up the seams, decide what to do with the extra under the counter (looks like the tape won't hold it on, so I might need to cut it flush instead). I should get that done in the next day or two!
This is the difficult side with the sink, so in theory the other side should go easier since it is larger but has less fiddly bits. It's a rectangle with a triangle section that goes to the stove. I might do it this weekend, not sure yet since I have a work thing. Overall, I'm pleased with how this is going. F ordered wall paper for the backsplash which is coming, she's putting that up and then I'll put some kind of trim situation along the wall. I also need to buy more double sided tape.
There weren't any outlet covers before I started in case you were wondering. I started pulling the tiles off and discovered that under the tile was....the old countertop. They never removed it. It was thin plastic fake wood and it was chipped and also gross. The tile cracked off in big pieces using the hammer claw but the plastic underneath had been glued onto the plywood and I guess ruined the plywood some. I had to use a chisel to get a big portion of it out and I ripped up bits of the plywood as well. Like some of the top layers of the plywood came up.
I also removed the weird wood board backsplash and those were glued on. And then I tried to remove one and the entire backsplash came away and I realized it was also the weird plastic fake wood in one big panel. Turned the electrical off, removed the backsplash in pieces. I had to break it to get it off around the outlets. I also found a note where they had done a shit job on the light switch on the left backsplash under the boards "This fabulous mess is brought to you by 'former owner' and 'friend'". I was steaming mad at that because it was such a terrible job.
Here is the counter and wall stripped down.
F put wood filler on the counter that I destroyed to level out the worst of the bits.
The hard part was around the sink. I debated on what to do. I didn't want to remove the sink because that would be super complicated and I suspected it was heavy. I went and got tacos for dinner one night and talked to my dad about the project. I decided I would lay 1/4 super smooth plywood over top of the counters in place. My dad had suggested getting premade counter tops but none of the counters are standard size except literally the one in the main part of the photo. The sink counter was an inch smaller. The plywood underneath was still solid, it was two pieces of 3/4 inch glued together until I really looked at it, and realized the bottom 3/4 inch board was actually a bunch of 3/4 inch planed tongue and groove planks. They must have gotten them super cheap, they're everywhere in the house. It was held onto the counters by...the sink and the trim.
Eventually I figured out that I could just lift the sink up slightly, get the old countertop out from under it and set it back on the 3/4 plywood. There wasn't any reason the sink needed to be on top of the 1/4 plywood and if I could get a good seal it was fine. So that's what I did. I had to borrow a pipewrench from a friend since I didn't have one for some reason. I will fix that soon. But the pipe seals were stuck, so I undid the drainpipes enough that they would move, gently pried the sink up and put shims underneath all around. I didn't need to unhook the water pipes at all since they had a lot of slack. I only raised the sink 3/8 inch or so. But it was enough to crack out the tile and plastic almost all the way around. I couldn't get it out from behind the sink, which was only 3/8inch wide. But the previous owner hadn't laid the tile down back there, and also hadn't caulked it. Argh!
I worked around, moving shims as I removed old counter. Finally got everything out that I could. Vacuumed everything and set the sink back down. Hooked the pipes back up, ran the water and no leaks! It probably got dropped 1/8 of an inch, so plenty of wiggle room in the pipes for that.
In this process I figured out that the sink is cast iron.
Please note that every side of the sink is round.
Then I started cutting plywood to size. This was the easy part. I had my jigsaw and a bunch of measurements and went to town. Easy peasy and the counter was almost square. Then I had to do around the sink. It took so long to check the wood, take another 1/8 inch off, check, then take another 1/8 off one spot, then another spot. Thankfully I was able to trace the cuts I made on the right side for the left side, but the front and back had to be done separately. The back I ended up breaking the 1/4 inch plywood because it was so delicate. It was fine. I used my extremely cool new tool, the oscillating saw, to cut out trim, cut edges of plywood that stuck out 1/4 inch more than needed and to sand everything smooth. Very fun.
I also installed a GFCI outlet since it is in the counter. That circuit runs the two outlets with the faceplates and the dishwasher. I still need to replace the light switch but it's a different circuit that runs a light and the stove. I screwed down the 1/4 inch plywood because it was easier than trying to glue it and I had just gotten done being very mad at someone for glueing stuff down. It was good I did since I screwed down the right side of the sink and then had to remove it to use it as a template for the left.
Yesterday morning, I made another run to the store because I hadn't actually decided how I was going to attach the vinyl. Picked up double sided tape. Cut my first chunk out and then realized I had cut the shape flipped from how I needed it since I was cutting on the bottom side, not the top. But that's why I had bought extra. Spent the day cutting and taping the counter down and here's where I'm at now.
I'm pleasantly surprised at how it's going. I'm not matching the counters where I make cuts, we don't care. Left to do: the back of the sink, caulk the bejesus out of it all, seal up the seams, decide what to do with the extra under the counter (looks like the tape won't hold it on, so I might need to cut it flush instead). I should get that done in the next day or two!
This is the difficult side with the sink, so in theory the other side should go easier since it is larger but has less fiddly bits. It's a rectangle with a triangle section that goes to the stove. I might do it this weekend, not sure yet since I have a work thing. Overall, I'm pleased with how this is going. F ordered wall paper for the backsplash which is coming, she's putting that up and then I'll put some kind of trim situation along the wall. I also need to buy more double sided tape.
no subject
Date: 2024-02-12 03:31 pm (UTC)no subject
Date: 2024-02-12 04:00 pm (UTC)The only damage from moving the sink is that I took a tiny chip out of the stove top while lifting. oops
no subject
Date: 2024-02-12 04:14 pm (UTC)no subject
Date: 2024-02-12 04:35 pm (UTC)It's funny that you say you wouldn't want to tackle it, because I still haven't tackled the tree that fell in the yard and I've been admiring your massive tree cutting projects these last few days.
no subject
Date: 2024-02-12 04:35 pm (UTC)Woohoo, accomplishment!
The general view today about pipe wrenches seems to be you either get Bahco (trad wrenches, particularly adjustable wrenches that don't suck) or Knipex (adjustable plier wrenches; smooth jaws, lots of range). Knipex sizes start at "is that real?" and run up to the limits of domestic plumbing requirements (16" handles); Bahco gets up into heavy machinery, "one wrench, one apprentice" sizes but starts reasonable.
no subject
Date: 2024-02-12 07:33 pm (UTC)no subject
Date: 2024-02-12 07:50 pm (UTC)Those will indeed work forever, though the amount of tact involved to not mangle the pipe isn't small.
I'd go for https://graytools.com/product/heavy-duty-pipe-wrenches but I don't know as you can get them where you are.
no subject
Date: 2024-02-12 07:17 pm (UTC)no subject
Date: 2024-02-12 07:34 pm (UTC)