I received a beautiful mohair fleece from ![[personal profile]](https://www.dreamwidth.org/img/silk/identity/user.png) reedrover at Giant Cricket Farm, who raises colored Angora goats, during Rhinebeck 2023. It was from her Angora goat Marla and it was a beautiful tan color. I decided that I would make a garment from this fleece in a year, with the goal to have it done by Rhinebeck 2024. The fleece was 3 lbs, 10 ounces.
reedrover at Giant Cricket Farm, who raises colored Angora goats, during Rhinebeck 2023. It was from her Angora goat Marla and it was a beautiful tan color. I decided that I would make a garment from this fleece in a year, with the goal to have it done by Rhinebeck 2024. The fleece was 3 lbs, 10 ounces.
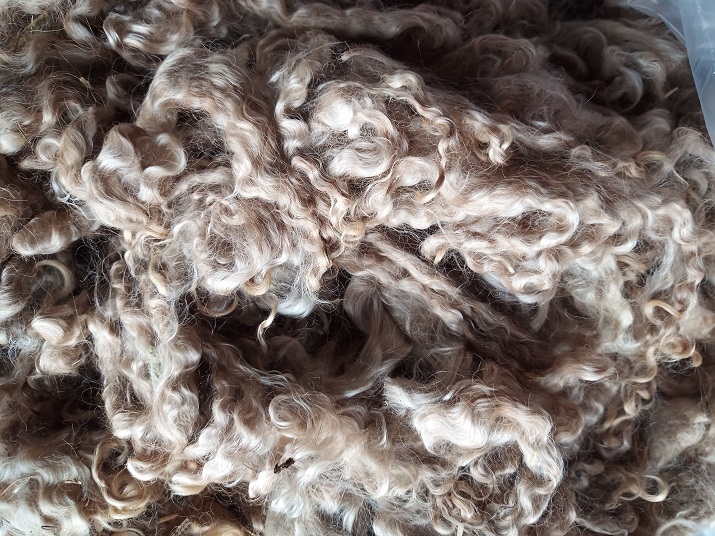
I took the fleece home and washed it. I always start all my fleeces with a cold soak since it gets a lot of the surface dirt out and seems to help the later washes. I didn’t do a hot scour like for wool since mohair doesn’t have the lanolin that wool does. Instead I did hot soaks, where I took the hottest tap water the sink could produce and did two soapy washes. Then I did three hot rinses. Then I did four more cold rinses to finally get the water looking clear enough that I called the fleece clean. Washing wool and mohair takes a ton of water!
I laid it out to dry and it was very pretty. At this point, I started thinking about the project itself. I am quite a fast fleece processor and spinner, so I wasn’t worried about getting those done. But I was worried about creating the fabric. I knit, crochet and weave, so I had options but the mohair was not going to be next-to-skin soft and I am an extremely slow knitter. I decided I would weave fabric and make a garment which was to be a 2 ply as it’s a little better for weaving. I love twills so I wanted to do some kind of simple twill.
I started processing the fleece using my wool combs on November 11th, 2023 with 44.5 ounces. It was similar to combing a longwool in that I had to adapt my technique slightly to accommodate the length of fibers. I also had to do more holding the fibers onto the comb with the hand receiving the fibers because of the extremely slippery nature of the mohair. If I didn’t, it would slide back out of the comb or I would need to put the tines further back in the fiber and reduce the length available. The fiber was extremely staticky and I had to apply water every full pass of the mohair to the other comb. I did two to three passes for every bundle of locks.
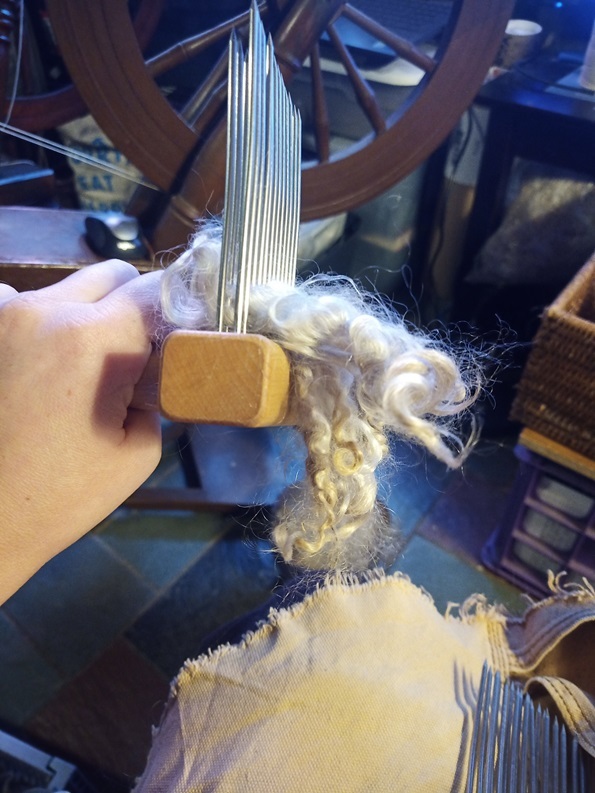

I also had to take extra care with the tiny individual locks that sometimes wouldn’t come apart. When I removed the fiber from the combs, I tried to catch those and tease them apart. Sometimes I did this during the combing. I ended up with 11 ounces combing waste, which I will blend with something else at some point in the future.
At the end of processing on January 11, 2024, I had 33 ounces of fiber piled up and it was glorious fluff.

I started spinning on January 24th, 2024. I chose to use my Canadian Production Wheel because of its fast speed and also it’s my favorite wheel to spin on. The mohair spun up well, I had to adapt my spinning to the fiber with much less of a long draw and more of a short draw with the twist in between my hands. The fiber was so long that it didn’t want to slide past itself so it required more helping along. I tended to grip the fiber in my fiber supply hand with the back part, more in the ring and pinky plus base of thumb and use my index and ring fingers to help along the fiber. The tiny bits of locks that I might not have properly combed caused a little bit of a problem as they would become part of the single as a whole lock which caused issues with the joins on either side. I figured out I could tilt my hand to pull a little from the side of the lock, which then broke it up enough to not have that problem. I am a spinning-by-feel person, so I let the fiber dictate the twist and width of the yarn so didn’t measure wpi as singles. The two ply plyback sample was very pretty and not super high twist.
I finished spinning the singles on April 16th and as I finished each bobbin, I transferred it to a storage bobbin.

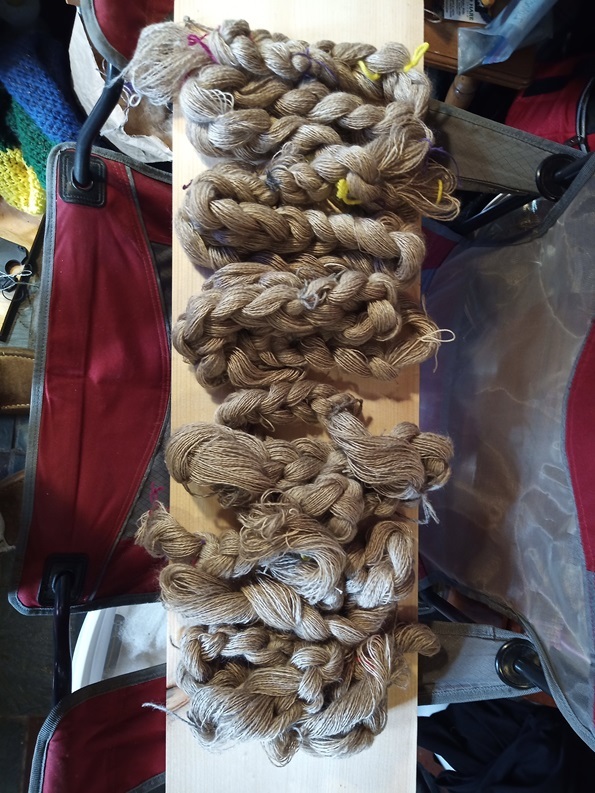
Then I started plying on my Electric Eel Wheel. I use this since it has more storage than my antique wheels which means I break up my skeins less. I do a decent amount of adjusting the speed and takeup when I first start plying but once that’s done I really just settle in and ply quickly. The two ply was finished up on April 22nd. With most yarns, I would skein it up and wash it, but mohair doesn’t really have crimp to relax in the same way as wool and I wasn’t going to dye it. The 2 ply wraps per inch was 26.

Instead I transferred it onto cones using the Electric Eel Cone Winder, which has been so fun to use and really excellent for setting up my handspun for weaving. I can measure the yardage while I do it. Final yardage was 3,577 yards total, so 1,788 yards for warp and 1,788 yards for weft.
I decided to do a plain 2x2 twill, just on the diagonal because it’s pretty and I like it. It also shows off the quality of the yarn. I did my calculations and mucked it up slightly but that’s okay. I warped my loom 29.5 inches wide since that’s the width of my reed. I did 17 ends per inch. With all of the calculations, I ended up with 3.6 yards in length of warp and in, theory, enough yarn left to be the weft for the whole thing.
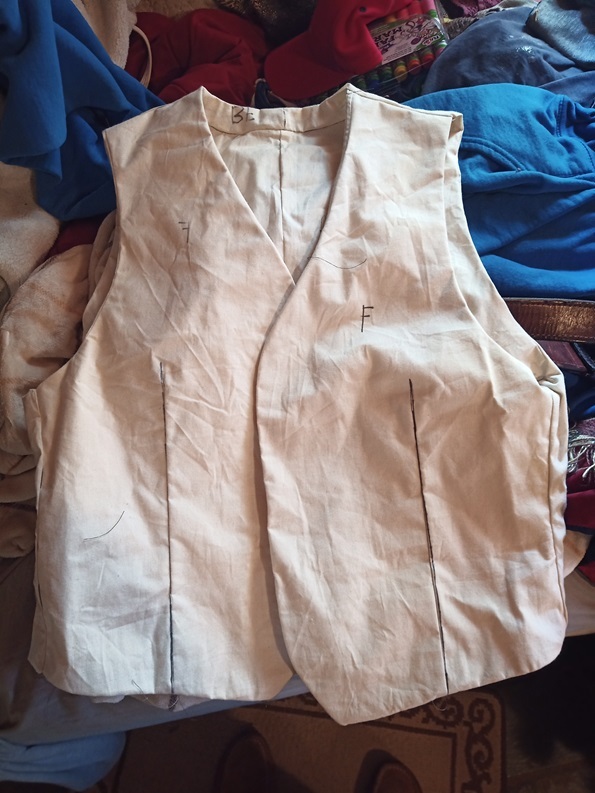
Warping and beaming on went well. In the middle of this, I decided to do a waistcoat. It would be small yardage, not too complicated and would be formal enough that I wouldn’t ruin the garment in my everyday life. I chose Belvedere Waistcoat pattern from Thread Theory. I made a mockup and it looked decent so I didn’t make any changes to the pattern. This would be my third garment ever, so I didn’t want to change things much. Up to this point, I had made a quilted jacket mockup that I just wore as a workcoat instead of making a proper garment and a long sleeve shirt.
I started warping on May 4th which went quickly and beaming on, threading heddles and sleying the reed also went quick. I started weaving on May 23rd. This went very fast since the yarn was a good size and the treadling was easy.

I ran out of weft on June 6th. My calculations had not been correct as there was still around a yard of warp on the loom. But I had 2.5 yards done which should be plenty. I cut it off the loom and left the rest of the warp where it was. I later spun up grey roving from Giant Cricket Farm and finished off the warp with that.

Now I had fabric! And a mockup! I tossed the fabric in my washer on delicate and cold, which is how I finish all my fabrics now. The mohair shed little bits of stuff and the washer was coated in it. I hung it to dry and then ironed it to get some persistent wrinkles out.
While the mohair was the main front fabric, I also needed and back and lining. For the back, I chose a green linen that I got for shirts, it was quite thin in comparison but I liked the color. For the lining, I chose a grey suiting fabric that I had gotten from a tailoring shop that had gone out of business and was clearing out their storeroom.
The mohair was very slick. To stabilize the weave, I stitched twice around the outside of the fabric, once with zigzag and once with straight stitch which marked the cutting line. I couldn’t physically mark the fabric because the weave moved so much. So I pinned the pattern piece to the fabric, sewed the straight stitch around the outside of the pattern piece, then removed the pattern, cut the piece out with an extra ¾ inch around the outside and zigzagged everything. The front fabric also had interfacing as required by the pattern, so I pad stitched the mohair to a piece of canvas to help stabilize it.
The pattern was modern bag construction, where you sew everything inside out and pull it through the hem and it was interesting to do it with three layers, the front, lining and back. The pattern was decent. I marked all my pieces with painters tape so I knew what was what. I didn’t really need to but it helped. I did all the proper things, pressing seams in the correct directions, cutting seam allowances on curves, all that jazz. I got a lot of advice from my zoom crafting group. The pattern had 5/8 seam allowances which does hide a lot of faults.
Things I changed to make it work with the mohair: I handstitched the darts down to the main fabric because they refused to press down, didn’t cut them in case they freyed, added a little patch of canvas at the top of the darts to even out the top and keep it from puckering weirdly, padstitching all of the interfacing canvas to the mohair and around the edges to keep it all together, much larger pattern pieces than the pattern called for to help keep the fabric from unraveling. Also as I assembled each piece of the front, I would stop and double check all the pieces were well connected and handsewed things as needed.
I finished it and turned it right side out, sewed up the hem by hand and then immediately noticed that one of the shoulders was no good. Because of the thickness of the fabric, it was really easy for the fabric to be out of place and not be noticeable since everything was so thick. And since the front fabric was sandwiched in the middle of everything I didn’t notice that it had basically slid out of the pile of shoulder. So I unpicked that shoulder seam, got everything back into place and just hand sewed it back together.
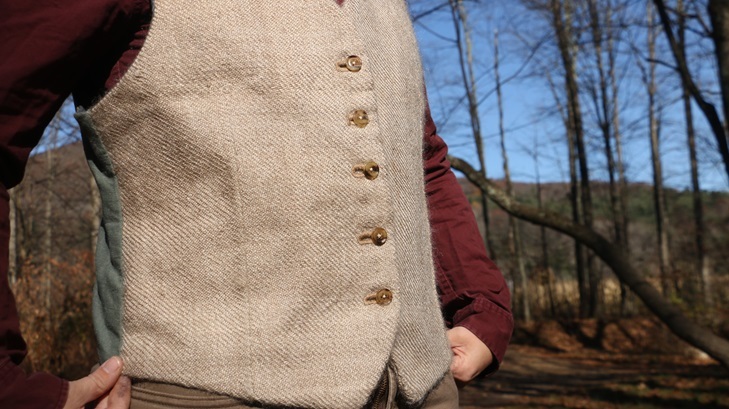
Then I cut and handsewed the buttonholes following Vincent Brigg’s tutorial which I used some gold cotton yarn I got in a weaver’s guild destash. The buttons were horn which I got online. I tried one with the bartack at the ends but I didn't like it, so I went back to buttonhole stitches all around the outside.

I took video of most of the construction, which maybe someday I’ll edit into a thing and put onto youtube, not sure yet.
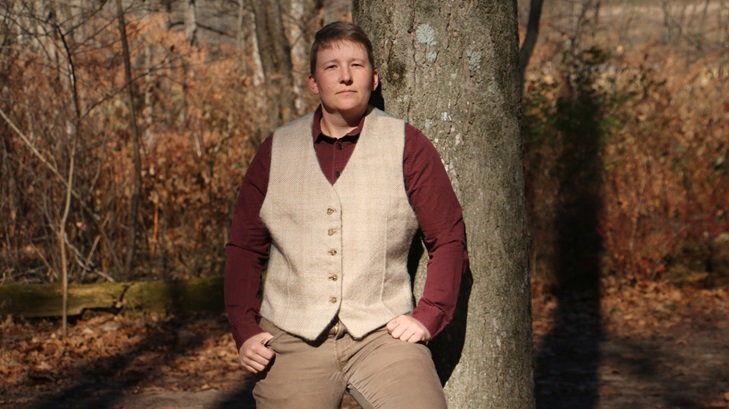
I finished sewing the waistcoat on August 13th, well ahead of my October deadline and I wore it to a wedding that month. Unfortunately, I wasn't able to get to Rhinebeck in 2024 but I hope it shows off the fleece well.
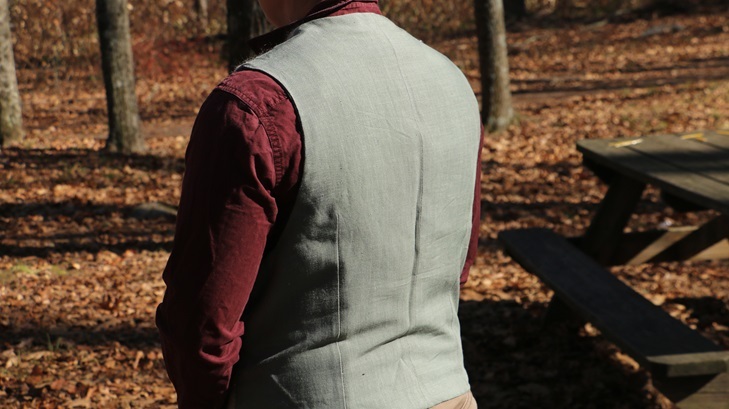
Now that I’ve worn it twice, I would make some minor changes. There is extra fabric under my arms which can be taken in and I would probably raise the back hem just a smidge. Those changes would take out some of the slight wrinkling that you can see in the photos. The waistcoat is also relatively heavy, so I suspect there’s more weight than ideal on the shoulder seams which probably should be reinforced at some point.
My sister is a good photographer and we went into the woods and she took some great photos, so much so that I actually put my face on the internet.


I took the fleece home and washed it. I always start all my fleeces with a cold soak since it gets a lot of the surface dirt out and seems to help the later washes. I didn’t do a hot scour like for wool since mohair doesn’t have the lanolin that wool does. Instead I did hot soaks, where I took the hottest tap water the sink could produce and did two soapy washes. Then I did three hot rinses. Then I did four more cold rinses to finally get the water looking clear enough that I called the fleece clean. Washing wool and mohair takes a ton of water!
I laid it out to dry and it was very pretty. At this point, I started thinking about the project itself. I am quite a fast fleece processor and spinner, so I wasn’t worried about getting those done. But I was worried about creating the fabric. I knit, crochet and weave, so I had options but the mohair was not going to be next-to-skin soft and I am an extremely slow knitter. I decided I would weave fabric and make a garment which was to be a 2 ply as it’s a little better for weaving. I love twills so I wanted to do some kind of simple twill.
I started processing the fleece using my wool combs on November 11th, 2023 with 44.5 ounces. It was similar to combing a longwool in that I had to adapt my technique slightly to accommodate the length of fibers. I also had to do more holding the fibers onto the comb with the hand receiving the fibers because of the extremely slippery nature of the mohair. If I didn’t, it would slide back out of the comb or I would need to put the tines further back in the fiber and reduce the length available. The fiber was extremely staticky and I had to apply water every full pass of the mohair to the other comb. I did two to three passes for every bundle of locks.
I also had to take extra care with the tiny individual locks that sometimes wouldn’t come apart. When I removed the fiber from the combs, I tried to catch those and tease them apart. Sometimes I did this during the combing. I ended up with 11 ounces combing waste, which I will blend with something else at some point in the future.
At the end of processing on January 11, 2024, I had 33 ounces of fiber piled up and it was glorious fluff.
I started spinning on January 24th, 2024. I chose to use my Canadian Production Wheel because of its fast speed and also it’s my favorite wheel to spin on. The mohair spun up well, I had to adapt my spinning to the fiber with much less of a long draw and more of a short draw with the twist in between my hands. The fiber was so long that it didn’t want to slide past itself so it required more helping along. I tended to grip the fiber in my fiber supply hand with the back part, more in the ring and pinky plus base of thumb and use my index and ring fingers to help along the fiber. The tiny bits of locks that I might not have properly combed caused a little bit of a problem as they would become part of the single as a whole lock which caused issues with the joins on either side. I figured out I could tilt my hand to pull a little from the side of the lock, which then broke it up enough to not have that problem. I am a spinning-by-feel person, so I let the fiber dictate the twist and width of the yarn so didn’t measure wpi as singles. The two ply plyback sample was very pretty and not super high twist.
I finished spinning the singles on April 16th and as I finished each bobbin, I transferred it to a storage bobbin.
Then I started plying on my Electric Eel Wheel. I use this since it has more storage than my antique wheels which means I break up my skeins less. I do a decent amount of adjusting the speed and takeup when I first start plying but once that’s done I really just settle in and ply quickly. The two ply was finished up on April 22nd. With most yarns, I would skein it up and wash it, but mohair doesn’t really have crimp to relax in the same way as wool and I wasn’t going to dye it. The 2 ply wraps per inch was 26.
Instead I transferred it onto cones using the Electric Eel Cone Winder, which has been so fun to use and really excellent for setting up my handspun for weaving. I can measure the yardage while I do it. Final yardage was 3,577 yards total, so 1,788 yards for warp and 1,788 yards for weft.
I decided to do a plain 2x2 twill, just on the diagonal because it’s pretty and I like it. It also shows off the quality of the yarn. I did my calculations and mucked it up slightly but that’s okay. I warped my loom 29.5 inches wide since that’s the width of my reed. I did 17 ends per inch. With all of the calculations, I ended up with 3.6 yards in length of warp and in, theory, enough yarn left to be the weft for the whole thing.
Warping and beaming on went well. In the middle of this, I decided to do a waistcoat. It would be small yardage, not too complicated and would be formal enough that I wouldn’t ruin the garment in my everyday life. I chose Belvedere Waistcoat pattern from Thread Theory. I made a mockup and it looked decent so I didn’t make any changes to the pattern. This would be my third garment ever, so I didn’t want to change things much. Up to this point, I had made a quilted jacket mockup that I just wore as a workcoat instead of making a proper garment and a long sleeve shirt.
I started warping on May 4th which went quickly and beaming on, threading heddles and sleying the reed also went quick. I started weaving on May 23rd. This went very fast since the yarn was a good size and the treadling was easy.
I ran out of weft on June 6th. My calculations had not been correct as there was still around a yard of warp on the loom. But I had 2.5 yards done which should be plenty. I cut it off the loom and left the rest of the warp where it was. I later spun up grey roving from Giant Cricket Farm and finished off the warp with that.
Now I had fabric! And a mockup! I tossed the fabric in my washer on delicate and cold, which is how I finish all my fabrics now. The mohair shed little bits of stuff and the washer was coated in it. I hung it to dry and then ironed it to get some persistent wrinkles out.
While the mohair was the main front fabric, I also needed and back and lining. For the back, I chose a green linen that I got for shirts, it was quite thin in comparison but I liked the color. For the lining, I chose a grey suiting fabric that I had gotten from a tailoring shop that had gone out of business and was clearing out their storeroom.
The mohair was very slick. To stabilize the weave, I stitched twice around the outside of the fabric, once with zigzag and once with straight stitch which marked the cutting line. I couldn’t physically mark the fabric because the weave moved so much. So I pinned the pattern piece to the fabric, sewed the straight stitch around the outside of the pattern piece, then removed the pattern, cut the piece out with an extra ¾ inch around the outside and zigzagged everything. The front fabric also had interfacing as required by the pattern, so I pad stitched the mohair to a piece of canvas to help stabilize it.
The pattern was modern bag construction, where you sew everything inside out and pull it through the hem and it was interesting to do it with three layers, the front, lining and back. The pattern was decent. I marked all my pieces with painters tape so I knew what was what. I didn’t really need to but it helped. I did all the proper things, pressing seams in the correct directions, cutting seam allowances on curves, all that jazz. I got a lot of advice from my zoom crafting group. The pattern had 5/8 seam allowances which does hide a lot of faults.
Things I changed to make it work with the mohair: I handstitched the darts down to the main fabric because they refused to press down, didn’t cut them in case they freyed, added a little patch of canvas at the top of the darts to even out the top and keep it from puckering weirdly, padstitching all of the interfacing canvas to the mohair and around the edges to keep it all together, much larger pattern pieces than the pattern called for to help keep the fabric from unraveling. Also as I assembled each piece of the front, I would stop and double check all the pieces were well connected and handsewed things as needed.
I finished it and turned it right side out, sewed up the hem by hand and then immediately noticed that one of the shoulders was no good. Because of the thickness of the fabric, it was really easy for the fabric to be out of place and not be noticeable since everything was so thick. And since the front fabric was sandwiched in the middle of everything I didn’t notice that it had basically slid out of the pile of shoulder. So I unpicked that shoulder seam, got everything back into place and just hand sewed it back together.
Then I cut and handsewed the buttonholes following Vincent Brigg’s tutorial which I used some gold cotton yarn I got in a weaver’s guild destash. The buttons were horn which I got online. I tried one with the bartack at the ends but I didn't like it, so I went back to buttonhole stitches all around the outside.
I took video of most of the construction, which maybe someday I’ll edit into a thing and put onto youtube, not sure yet.
I finished sewing the waistcoat on August 13th, well ahead of my October deadline and I wore it to a wedding that month. Unfortunately, I wasn't able to get to Rhinebeck in 2024 but I hope it shows off the fleece well.
Now that I’ve worn it twice, I would make some minor changes. There is extra fabric under my arms which can be taken in and I would probably raise the back hem just a smidge. Those changes would take out some of the slight wrinkling that you can see in the photos. The waistcoat is also relatively heavy, so I suspect there’s more weight than ideal on the shoulder seams which probably should be reinforced at some point.
My sister is a good photographer and we went into the woods and she took some great photos, so much so that I actually put my face on the internet.